Static testing and dynamic testing are two essential approaches in software testing. While dynamic testing involves software execution, static testing examines work products, such as code or documentation, without execution. Static testing includes two methods: manual examination, where team members review work products to identify issues, and tool-driven evaluation, where specialized software tools perform static analysis.
Static testing is a critical technique as it can identify errors and defects in the software development lifecycle before software execution takes place. This can save time and resources by catching issues early, leading to improved software quality. Static testing also helps in improving the maintainability of the software and reducing the cost of testing by identifying issues early on. By detecting defects early, static testing can enhance the efficiency and effectiveness of the entire software development process.
What are Reviews in Software Testing:
In software testing, a review is a process of examining a software product or component by a group of individuals to detect defects, errors, or vulnerabilities. The primary goal of reviews is to identify and fix issues in the early stages of the software development life cycle to save time and cost.
Reviews play a crucial role in the software development process. It identifies and addresses errors and issues before they become problematic. Reviews can be informal or formal, depending on the level of rigor and structure involved.
Informal reviews are often less structured and involve team members informally reviewing code or other work products and discussing issues. On the other hand, formal reviews are more structured, involving documented procedures, and a diverse team with varied roles and perspectives, making them comprehensive.
Formal reviews typically produce documented results, including any issues identified and how they were resolved. This documentation is useful for tracking progress, ensuring accountability, and improving future reviews’ quality. Overall, reviews are essential to the software development process as they ensure the software is of high quality and meets the desired requirements.
Reasons why Reviews are Important:
First, they improve the quality of the software product or component by identifying and resolving defects early in the development process, preventing issues from reaching end-users, leading to enhanced customer satisfaction and reduced support requests.
Second, reviews reduce the overall cost and time of the software development project by catching defects early, saving time, and resources that would otherwise be needed to address issues in later stages of the development cycle.
Third, they provide an opportunity for knowledge sharing and collaboration among team members, promoting best practices and fostering improved teamwork and productivity.
Fourth, they ensure compliance with regulatory and industry standards by identifying issues that may be in violation of regulatory requirements or industry standards, allowing for corrective action to be taken before the product is released.
ISO/IEC 20246 is an internationally recognized standard that provides detailed guidelines for conducting reviews of work products during the software development process. The standard outlines team member roles and responsibilities and offers a range of review techniques to choose from, making the review process more efficient and effective.
The work product review process involves several main activities:
Planning :
During the planning phase, the following activities are performed:
Defining the scope
Estimating effort and timeframe
Identifying review characteristics
Selecting the people to participate in the review and allocating roles
Defining entry and exit criteria
Initiating the review:
During the initial review phase, the following activities are performed:
Distributing the work product and related material
Explaining the scope, objectives, process, roles, and work products to the participants
Answering any questions that participants may have about the review
Individual review:
During the individual review phase, participants perform the following activities:
Reviewing all or part of the work product
Noting potential defects, recommendations, and questions
Issue communication and analysis:
During the issue communication and analysis phase, the following activities are performed:
Communicating identified potential defects
Analyzing potential defects and assigning ownership and status to them
Evaluating and documenting quality characteristics
Evaluating the review findings against the exit criteria to make a review decision
Fixing and reporting:
During the fixing and reporting phase, the following activities are performed:
Creating defect reports for findings that require changes to a work product
Fixing defects found in the work product reviewed
Communicating defects to the appropriate person or team and recording the updated status of defects
Gathering metrics
Checking those exit criteria are met
Accepting the work product when the exit criteria are reached
In a formal review, there are several roles and responsibilities that are typically assigned to participants.
Roles and Responsibilities:
Moderator/Chairperson: Responsible for conducting the review meeting. It ensures that the review is conducted according to the review process, and ensures that the review objectives are met.
Author: The person who wrote the work product being reviewed.
Reviewer: A person who is responsible for reading and analyzing the work product being reviewed and identifying any defects, issues, or potential improvements.
Recorder/Scribe: Responsible for recording the minutes of the review meeting and documenting the issues raised, the decisions made, and any action items assigned.
Manager: A person who is responsible for managing the review process and ensuring that the review is conducted effectively.
Quality Assurance Representative: Responsible for ensuring that the review process is in compliance with organizational quality standards and procedures.
Technical Expert: A person who has expertise in the subject matter being reviewed. Also, the person who can provide technical advice and guidance during the review process.
Each of these roles has specific responsibilities and tasks that are assigned to them during the review process. So to ensure a successful review, it is crucial to clearly communicate the roles, responsibilities, processes, and objectives to each participant. This will ensure everyone is aligned and comprehends their expected roles during the review.
Types of reviews include:
Additionally, there are several types of reviews that can be conducted during the software development lifecycle
Peer Review: A review of a work product involves one or more peers with comparable expertise and authority level.
Technical Review: A review that focuses on the technical aspects of a work product, such as design, code, or architecture.
Walkthrough: A review that involves the author of the work product presenting the work product to a group of reviewers, who ask questions and provide feedback.
Inspection: A highly formal and structured review that involves a team of reviewers examining a work product in detail to identify defects and potential improvements.
Audit: A review that focuses on ensuring compliance with standards, regulations, or policies.
Management Review: A review that is conducted by management to ensure that the project or work product is progressing as planned and to identify any potential issues or risks.
Review type choice depends on factors like work product nature, review goals, and available resources.
Conclusion:
Reviews are a critical component of the software development lifecycle. By tapping into the collective knowledge and expertise of team members, reviews enable the early identification of defects and potential improvements, leading to improved software quality and reduced costs and time. Furthermore, reviews facilitate communication and collaboration among team members, fostering a culture of continuous improvement and knowledge sharing.
In addition, reviews help organizations to comply with regulatory and industry standards, thereby mitigating risks and maintaining the trust of their stakeholders. Overall, reviews are a valuable tool for any software development team aiming to deliver high-quality software products efficiently and effectively.
Apurva is a Test Engineer, with 3+ years of experience in Manual and automation testing. Having hands-on experience in testing Web as well as Mobile applications in Selenium and Playwright BDD with Java. And loves to explore and learn new tools and technologies.
To ensure comprehensive mobile app testing, it is essential to do 360-degree testing for functions, appearance, and performance on multiple devices with various configurations, sizes, resolutions, and platforms.
There are three ways to conduct mobile app testing:
Emulators for Android devices and Simulators for iOS devices
Real physical devices
Cloud-based real devices platform
Testing an application on different platforms, including emulators and simulators, as well as physical devices, comes with a set of challenges.
Emulators and Simulators:
When it comes to emulators and simulators, creating multiple virtual devices with different configurations can be difficult, and they may not accurately replicate real-world situations compared to physical devices.
Physical devices:
On the other hand, testing on physical devices poses its own set of difficulties. It requires a large number of devices to test app compatibility with different configurations, and the list of devices keeps changing as new models are introduced to the market. Additionally, cross-location testing can be challenging since carrying multiple devices across different locations can be cumbersome.
To address these challenges, a possible solution is to use cloud-based platforms for testing applications in real-world conditions. By doing so, we can perform robust testing with a variety of devices and configurations without the need to physically acquire and maintain them.
Cloud-based platform (BrowserStack) :
BrowserStack is a cloud-based real devices platform that provides support for both manual and automated testing of mobile apps for both Android and iOS devices.
One of its standout features is the App Live feature, which allows users to manually test their mobile apps on over 3000 real Android and iOS devices.
BrowserStack also supports 15+ native features, such as GPS, network simulation, and localization, which can be used to test mobile apps in real-world scenarios.
Other features include debugging apps, viewing crash reports and logs, inspecting UI elements, and using stack traces to find and fix bugs instantly. These features make it easy for developers to identify and fix issues quickly and efficiently.
Furthermore, BrowserStack supports testing across different environments, including Dev, QA, Staging, and Production apps from the play store or app store. This makes it easy for developers to test their apps in various environments and ensure that they are working correctly in each environment.
To test a mobile app on BrowserStack, follow these steps:
4. Here in the left panel “SELECT SOURCE” you can see different options available to upload or install apps.
i. Uploaded Apps – You can upload an apk or ipa file here.
ii. Sync with App Centre – If you have access to the app center you can use this option to directly install the app from App Centre.
iii. Install via TestFlight – While testing on iOS devices you can install the app directly from TestFlight also.
iv. Install via Play Store – Select a device, sign in to the play store and install the app if available on Play Store.
v. Install via App Store – Select a device, sign in to the App store and install an app, if available on App Store.
Now let’s explore how to upload apk file from a local machine using Upload Apps here…
i. Click on Upload – Select apk/ipa file from your local machine to be uploaded.
ii. Select the uploaded apk/ipa file and device from the list of available devices in the right panel.
iii. You can select any device from the list for the selected device category.
iv. Once you click on the device name the device will be launched and the app will be installed on it.
Now once the app is launched on the selected device you can start testing the app.
Let’s explore various features that can be used effectively while testing…
1. Report Bug:
If you find a bug while testing, BrowserStack provides the option to highlight the bug on the screen and add a bug description.
You can download the image to include it in the defect report later or send a screenshot to the developer or your team via email.
Additionally, you can share the image using various applications such as Jira, Slack, GitHub, etc. This option is visible in the screenshot below.
Then click on Cancel to return back to the testing screen.
2. Record Session:
This feature can capture a video recording of a sequence of events that led to a bug.
Choose the screen to be recorded.
After recording a session using BrowserStack, you can stop the sharing by clicking on the “Stop Sharing” button. Then, you can download the recording for later use.
3. Switch Device
This feature allows users to switch to another device at any point in time to test the same app on different devices.
The toolbar on the right side of BrowserStack provides various features to simulate real device features, including:
View open apps on the device.
Kill existing apps if they become unresponsive or test app behavior on a relaunch.
Capture screenshots, similar to taking screenshots on a physical phone.
Rotate the screen to test the app’s responsiveness to different screen orientations.
Some other important features are:
Change Location: This feature is used to test app behavior and response across different geographical locations. You can use the “Device GPS” option to set the exact latitude and longitude coordinates or the “IP Location (Beta)” option to select a specific region from a list of locations. See the screenshot below for reference.
Change Language – This feature can be used to test apps in different languages.
File & Media – This feature allows you to transfer various types of files to and from the device during testing.
On the right-hand side of the window, we have the following options in the Dev Tools section:
INSPECT (BETA) –This option is used to find element locators for app automation testing.
NETWORK Tab – This feature is useful for monitoring backend HTTP requests and responses in real-time. It can help you to debug the cause of failures during certain events in the app.
On the BrowserStack cloud platform, you can also test various native device features just like physical devices. These include:
Geolocation testing
Push notifications
Pre-loaded images
Network simulation
Testing dependent apps
Uninstalling apps
Conclusion:
Overall, BrowserStack is a convenient and easy-to-use cloud-based real devices platform that provides a wide range of features for mobile app testing. Its support for manual and automated testing, along with its native features and ability to test across different environments, makes it a popular choice among developers.
Result-driven Manager – SDET with a strong focus on project management, quality delivery, and team leadership. Adept at leading QA and automation across Web, Mobile, and API platforms within Agile/DevOps frameworks. Skilled in managing cross-functional teams, optimizing project execution, and driving customer satisfaction. Experienced in stakeholder engagement, risk mitigation, and strategic resource planning. Proven success in developing scalable test strategies, integrating automation into CI/CD pipelines, and fostering continuous QA improvements.
To deliver a good quality of work creating a robust software testing framework is a very important task. Every tester has his/her own approach or method to create a testing framework but the most common and important thing is creating a framework in such a manner that the other testers with minimal knowledge of automation testing can easily utilize the framework. While creating a framework there are some key points that we should consider you will find these points mentioned below.
A good tester is one who has the ability to create a good testing framework. In this blog, I have explained how to create an automation testing framework. Even a beginner with minimal knowledge of automation testing can use this approach to create his own testing framework. There are many more things that you can implement in this explained framework so feel free to comment on it.
When I started my journey as an SDET creating a framework was my first task assigned in my training so I can understand how important it is to create your own framework. Together in this blog, we will see the guidelines I have described which will help us to create a testing framework.
Before we jump into the main topic of our discussion let’s just quickly see the steps we will be following while creating our own framework.
Key Considerations When Creating an Automation Testing Framework:
Understanding the Requirements
Selecting a Testing Framework
Designing Test Cases
Implementing Test Cases
Executing Tests
Maintaining and Improving the Framework
Among the various frameworks present one of the most popular frameworks used for automation testing i.e. the combination of python’s behave library and selenium. In this blog, we are going to explore how to build and use this framework for our automation testing.
As everyone is familiar with Selenium which is an open source and one of the widely used tools for web automation testing along with Playwright and Cypress. Behave is a python library that is used for the BDD (Behavior Driven Development). Let’s just quickly explore what are the different frameworks present out there for automation testing.
A software automation testing framework is designed to make the process of testing software more efficient and easy to use. Every framework has its own advantages and disadvantages as per the given requirement it is most important for us to choose the right framework for automation. Below you will find some of the most commonly used and popular automation frameworks.
Types of Test Automation Frameworks:
Linear Scription Framework.
Modular Testing Framework.
Data-Driven Framework.
Keyword Driven Framework.
Hybrid Framework
Behavior Driven Development Framework.
Test Driven Development Framework.
In this blog, we will be building a BDD framework using Python’s behave library and selenium. In BDD we use the natural language to describe our test scenario divided into steps using the Gherkin language. These test scenarios are present in a feature file and because of the use of natural language, the behavior of the application is easily understandable by all. So, we can say that while creating a BDD framework one of the key components we should consider to use of the feature files and the step files.
As described earlier a feature file is written in natural language with the help of Gherkin language by following a set format. While a step file is an implementation of the steps present in the feature file. Here, a step file is a python file and we can see that it is full of a set of functions where those functions correspond to the steps described in the feature file. Now that we have seen what is feature file and step file let’s see what is the use of python’s behave library here, so basically once the steps and feature file are ready the behave will start automatically matching the steps present in the feature file with its corresponding implementation in the step file and will also check for any assertion errors present.
5. We can also install all the required packages using the requirement.txt file using the below command.
pip install -r requirement.txt
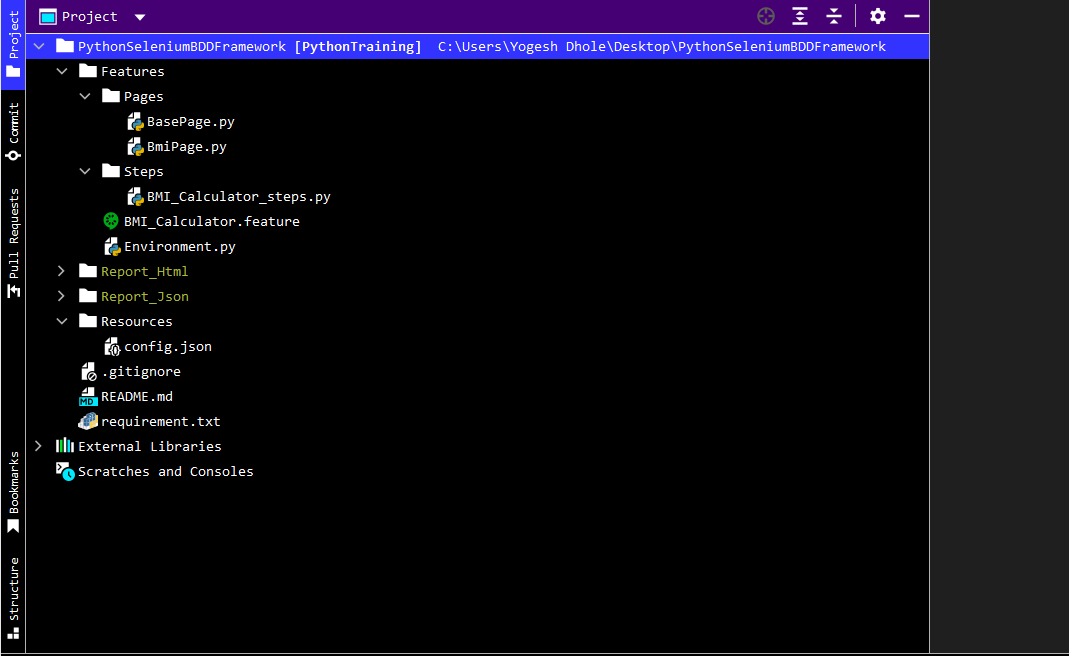
Framework Structure Overview:
Here is the overview of our python selenium behave BDD framework.
As a beginning, we are going to start with creating a simple framework using one scenario outline. In the next blog, we are going to see how to create an API testing framework using python. To understand both of them please read the blog carefully as I am explaining all the points here in natural language, without wasting any time let’s dive into the main topic of our discussion i.e. how to create python selenium behave BDD automation testing framework.
For this, we will follow some guidelines which I have described as steps.
Step 1:
Create a project in Pycharm (here I am using Pycharm professional) and as mentioned in the prerequisites install the packages.
It is not compulsory to use pycharm professional we can use pycharm community as well.
Step 2:
In this step, we will be creating a Features folder in which we will be creating our feature files for different scenarios. A feature file is something that holds your test cases in the form of a scenario and scenario outline. In this framework, we are using a scenario outline. Both scenario and scenario outline contain steps that are easy to understand for non-technical persons. We can also assign tags for the feature files and for the scenarios present in that file. Note that the feature file should end with a .feature extension.
Feature: Create test cases using Selenium with Python to automate below BMI calculator tests


#  We are using Scenario Outline in this feature as we can add multiple input data using examples.

  Scenario Outline: Calculating BMI value by passing multiple inputs
    Given I enter the "<Age>"
    When I Click on "<Gender>"
    And  I Enter a "<Height>"
    And  I Enter the "<Weight>"
    And  I Click on Calculate btn
    And  I Verify Result with "<Expected Result>"
    Examples:

      | Age | Gender  | Height  | Weight  | Expected Result |
      | 20  | Male    |  180    |  60     | BMI = 18.5 kg/m2|
      | 35  | Female  |  160    |  55     | BMI = 21.5 kg/m2|
      | 50  | Male    |  175    |  65     | BMI = 21.2 kg/m2|
      | 45  | Female  |  150    |  52     | BMI = 23.1 kg/m2|
Step 3:
Now, we have our feature file let’s create a step file to implement the steps described in the feature file. In order to recognize the step file we are adding step work after the name so that behavior will come to know the step file for that particular feature file. Both feature files and step files are essential parts of the BDD framework. We have to be careful while describing the steps in the feature file because we have to use the same steps in the step file so that behavior will understand and map the step implementation.
from behave import *

# The step file contains the implementation of the steps that we have described in the feature file.

@given('I enter the "{Age}"')
def step_impl(context, Age):
    context.bmipage.age_input(Age)

@when('I Click on "{Gender}"')
def step_impl(context, Gender):
    context.bmipage.gender_radio(Gender)

@step('I Enter a "{height}"')
def step_impl(context, height):
    context.bmipage.height_input(height)

@step('I Enter the "{weight}"')
def step_impl(context, weight):
    context.bmipage.weight_input(weight)

@step("I Click on Calculate btn")
def step_impl(context):
    context.bmipage.calculatebtn_click()

@step('I Verify Result with "{expresult}"')
def step_impl(context, expresult):
    context.bmipage.result_validation(expresult)
Step 4:
In step 4 we will be creating a page file that contains all the locators and the action methods to perform the particular action on the web element. We are going to add all the locators at the class level only and will be using them in the respective methods. The reason behind doing so is it is a good practice to declare your locators at the class level as when the locators get changed it is effortless to replace them and we don’t have to go through the whole code again.
from selenium.webdriver.common.by import By
import time
from Features.Pages.BasePage import BasePage


# The page contains all the locators and the actions to perform on that web element.
# In this page file we have declared all the locators at the class level and we are using them in the respective methods.

class BmiPage (BasePage):
    def __init__(self, context):
        BasePage.__init__(self, context.driver)
        self.context = context
        self.age_xpath = "//input[@id='cage']"
        self.height_xpath = "//input[@id='cheightmeter']"
        self.weight_xpath = "//input[@id='ckg']"
        self.calculatebtn_xpath = "//input[@value='Calculate']"
        self.actual_result_xpath = "//body[1]/div[3]/div[1]/div[4]/div[1]/b[1]"

    def age_input(self, Age):
        AgeInput = self.driver.find_element(By.XPATH, self.age_xpath)
        AgeInput.clear()
        AgeInput.send_keys(Age)
        time.sleep(2)

    def gender_radio(self, Gender):
       SelectGender = self.driver.find_element(By.XPATH, "//label[normalize-space()='" + Gender+"']")
        SelectGender.click()
        time.sleep(2)


    def height_input(self, height):
        HeightInput = self.driver.find_element(By.XPATH, self.height_xpath)
        HeightInput.clear()
        HeightInput.send_keys(height)
        time.sleep(3)

    def weight_input(self, weight):
        WeightInput = self.driver.find_element(By.XPATH, self.weight_xpath)
        WeightInput.clear()
        WeightInput.send_keys(weight)
        time.sleep(3)

    def calculatebtn_click(self):
        Calculatebtn = self.driver.find_element(By.XPATH, "//input[@value='Calculate']")
        Calculatebtn.click()
        time.sleep(3)

    def result_validation(self, expresult):
        try:
            Result = self.driver.find_element(By.XPATH, "//body[1]/div[3]/div[1]/div[4]/div[1]/b[1]")
            Actualresult = Result.text
            Expectedresult = expresult
            assert Actualresult == Expectedresult, "Expected Result Matched"
            time.sleep(5)
        except:
            self.driver.close()
            assert False, "Expected Result mismatched"
The next one is the base page file. We are creating a base page file to make an object of the driver so that we can easily use that for our page and environment file.
from selenium.webdriver.support.wait import WebDriverWait


# In the base page we are creating an object of driver.
# We are using this driver in the other pages and environment page.


class BasePage(object):
    def __init__(self, driver):
        self.driver = driver
        self.wait = WebDriverWait(self.driver, 30)
        self.implicit_wait = 25
Step 5:
This step is very important because we will be creating an environment file (i.e. Hooks file). This file contains hooks for before and after scenarios to start and close the browser. Also if you want you can add after-step hooks for capturing screenshots for reporting. We have added a method to capture screenshots after every step and will attach them to the allure report.
import json
import time

from allure_commons._allure import attach
from allure_commons.types import AttachmentType
from selenium import webdriver
from webdriver_manager.chrome import ChromeDriverManager
from Pages.BasePage import BasePage
from Pages.BmiPage import BmiPage

data = json.load(open("Resources/config.json"))


# This environment page is used as hooks page. Here we can notice that we have used before, after hooks along side with some step hooks.


def before_scenario(context, scenario):
    context.driver = webdriver.Chrome(ChromeDriverManager().install())
    time.sleep(5)
    basepage = BasePage(context.driver)
    context.bmipage = BmiPage(basepage)
    context.stepid = 1
    context.driver.get(data['BMIWEBURL'])
    context.driver.maximize_window()
    context.driver.implicitly_wait(3)


def after_step(context, step):
    attach(context.driver.get_screenshot_as_png(), name=context.stepid, attachment_type=AttachmentType.PNG)
    context.stepid = context.stepid + 1


def after_scenario(context, scenario):
    context.driver.close()
Step 6:
It is a good practice to store all our common data and files in a resource folder. So, whenever we need to make changes it will be easy to implement them for the whole framework. For now, we are adding a config.json file in the resource folder. This file contains the web URL used before the scenario to launch the web page for the specified tag in the feature file. The file is written in JSON format.
Congratulations, finally we have created our own Python Selenium Behave BDD framework. As I mentioned earlier we will be using Allure for reporting the test result. For this use the below command in the terminal and it will generate the result folder for you.
Creating a testing framework is very important as well as feels like a tedious task but with the right guidelines, everyone can create a testing framework. I hope in this blog I have provided all the answers related to the python selenium behavior automation testing framework. Here, we choose a BDD framework over other existing frameworks because of its better understanding, easy to adapt, and easy to understand for end users. If you still have any issues related to what we have seen earlier feel free to comment them down we will solve them together. There are many more things we can add to this existing framework but to get started I feel this framework is enough and will cover most of the requirements.
In this article, I will introduce the concept of codeless automation as an innovative and efficient solution for software testing with minimal coding. Performs to increase the importance of time-to-market in product success, codeless automation helps to reduce testing time in release cycles, making it a growing trend in software testing.
One of the most notable codeless automation frameworks is Ginger, an open-source tool created and published by Amdocs under an Apache 2.0 license.
Advantages of codeless automation over traditional code-based automation:
No programming skills are required
Test automation can start from day 1
Keep pace with the development cycle
Faster and more efficient test development
Ginger is a free and open-source automation framework with the following features:
AI-driven automation
Supports various platforms such as web, mobile, windows, APIs, etc.
Simple drag-and-drop approach for codeless automation
Dynamic Error handling with self-healing capabilities
Ability to reuse existing automation scripts
Reduced average repair time
Software reusability across the software lifecycle
Automates visual validations
Built-in integrations with popular open-source tools such as QC, Jira, CI/CD, Jenkins, Bambootools, and others.
Similarly, we will expand the Ginger to investigate and create a web application automation script:
Where can you find Ginger?
You need to Visit “ginger.amdocs.com” and download the latest version of the tool. Below you can see the dashboard.
How do you set up Ginger?
Once the Ginger is downloaded, now double-click on the application file, and a license agreement window will be displayed – select ‘I accept the agreement’, browse the destination location where you want it installed, and click on ‘Next’.
Now, select the default user type and terminology, and then click ‘Install’.
After successfully installing the application. Now, click on the created shortcut to access the Ginger homepage.
Your first Project in Ginger
Here, we will perform Web application automation using Ginger, let’s create a solution for the same. A solution in Ginger is a logical structure with complete automation-related files and only one solution can be loaded at a time. However, multiple target applications can be added to the same solution.
Click on ‘Create a new solution‘
‘Add Solution’ window
Enter the solution name
Browse the location to be stored
Select the ‘main application platform (‘web’)
Enter the ‘solution password encryption key’
Click on the ‘Create’ button
The following diagram depicts the ‘Business Flow,’ which is an end-to-end (start-to-finish) logical flow of the project/business.
So, now the folder structure is automatically created. Once the project solution is created.
Here, multiple target applications can be added to the same solution.
Go to the ‘Configurations’ tab
Click on ‘add (+)’ button
Select the desired application from the window displayed
Accordingly, the target applications have been merged into the solution:
Go to the ‘Business Flows’ tab
Click on the ‘Edit’ tab
Select the desired application in the solution
Configure the agent
Agents are the platform where the scripts will run. First, you select the driver type where you want to launch the application and click the ‘Agents’ tab.
Now, navigate to the ‘Resources’ tab and create an environment for the desired application. An environment stores application-related data such as login credentials, server connection information, and automation flow. One should use environment variables as much as possible to store any configurations that may change per environment.
Given that you have created a new environment, it will ask whether you want to share it with all or a subgroup of the target applications created under business flow.
Given that you have created a new environment, it will ask whether you want to share it with all or a subgroup of the target applications created under business flow. Therefore, you can also create a new environment by cloning one that already exists.
You can also create a new environment by cloning one that already exists.
Now, click on the environment created
A list of target applications assigned to this environment is displayed
Select the desired application and it will open displaying three environment-specific tabs: Parameters, Databases, and Login Users.
Add a new Activity
Basically, you need to navigate to Business Flows and add a new activity. These activities are a collection of actions required to complete a function or intended task.
For example:
The user successfully logged in using valid credentials. Here logging in with valid credentials is a functional activity that can be completed using a set of actions.
Under this activity, multiple actions can be created. You can click on the ‘Automate’ tab in the top right corner of the page and add automation actions from the ‘Action Library’ in the toggle panel. Now on the top bar, the target application configured agent, and environment that you have chosen for the current business flow is displayed.
Essentially, the actions library is divided into four categories: plugin actions, legacy actions, platform actions, and general actions.
In the below image, a ‘Bowser Action’ is added, and double-click it to add a value, i.e. to add various operation settings.
First, go to Expression settings, navigate to the desired folder structure, and enter the URL value, which can be parameterized in the environment.
Now let’s add actions to the activity
We’ve launched the website in the driver; now we’ll locate the elements and log in with the appropriate credentials.
After that Select ‘UI Element Action’ from the Action Library in the toggle panel and provide details about the element to be located.
So, the element ‘Username’ is located using XPath to perform send keys operation.
The following shows the configuration for locating a button and clicking on it for successful login.
Because the configuration shown in the following figures is used to verify the element that appears on the page is successful login.
Variables – To validate the text retrieved after login, go to the expression editor and add the activity variable.
A variety of variables can be included, such as –
‘Variable String’ – To verify a string on the page
‘Variable Random Number’ – To verify a number randomly generated every time within a given range
‘Variable List’ – To verify a variable from a list specified
‘Variable Number’ – To generate a random number between the given minimum and maximum range of number
‘Variable Password String’ – To encrypt the entered password
‘Variable Sequence’ – To give minimum and maximum range of numbers with a specified interval
‘Variable Timer’ – To use as a timer
Similarly, other actions, as shown in the figure below, are added to browse other tabs.
From the ‘Execution Report’ tab, screenshot capture and log details can be enabled.
So here, all the actions of the test scenario are completed, Now click the ‘Run Activity’ button located at the top of the page.
Following is the execution, you can check the output values under ‘Actual Value’ and ‘Expected Value,’ as shown below.
The following image shows the execution in progress
The actual below image shows the execution is completed.
Adding run set
The Run Set is a real-time dashboard with a single complete end-to-end project flow comprised of various activities. It displays the entire Business flow, including actions, activities added and executed, and steps passed, pending, failed, or blocked.
First, you need to Set up the ‘Run Sets’ by adding the desired Business Flow and to start the execution, click on the runner tab button.
Also, you can get a complete execution history:
Navigate to ‘Run Sets
Executions History’ tab
Following are the Execution Results shown in the output of the execution.
Execution Report
The following section shows a failed scenario.
To start, we need to create a new Run Set.
Then add a new runner set, go to the ‘Run Sets’ tab, and click the ‘+’ button.
Now, Click on the ‘+’ button to add a Business flow to the runner.
After adding the business flow, you can see the number of activities and actions in the run set.
So, to run the run set, click the ‘run button’ shown in the image below.
Now, the execution is seen in progress
Here, the runner display number of failed actions, and clicking on the ‘Generate Run Set Report option’, will create a detailed execution report.
The following shows the execution report of the failed test scenario.
Formation of the Execution Reports displays a detailed execution that includes. The following information is an action name, and action type, So now execution – start, duration, and end time, number of retry iterations, status (passed/failed), Error details, and screenshots.
Therefore, we have completed Web application automation using Ginger successfully. Happy Testing!!
Conclusion: –
Ginger strikes me as a simple and modern automation tool that can be used to create test cases in natural language, making it a valuable platform for continuous testing, regression testing, and progressive testing.
An SDET with hands-on experience in Functional testing on Web and Mobile applications, System testing, Requirement analysis, Defect reporting, Web, Mobile, and API Test Automation. Practical experience in Python, JavaScript, C#, Selenium, Playwright, SpecFlow, Behave, Pytest, BrowserStack, Appium, Postman, SQL
For any web automation testing, the one and most important task is to identify and use robust locators to identify web elements so that your automated tests do not fail with “Unable to locate element”. In this article, we are providing you with the techniques that every tester should learn to create those robust locators. As we already know this can be done using different locator strategies. In this blog, we are going to learn about XPath. Before we dive into the topic of our discussion let’s just get more familiar with Xpaths. Let’s start with,
What is XPath?
XPath (XML Path Language) is an expression language that allows the processing of values conforming to the data model defined in the XQuery and XPath Data models. Basically, it is a query language that we use to locate or find an element present on the webpage. It is defined by the World Wide Consortium (W3C). Now, let’s discuss why Xpaths are necessary.
Why is XPaths necessary?
Xpaths are the most widely used locators in automation though there are other locators like id, name, class name, tag name, and so on. Also, it is used when there are no unique attributes available to locate the web element. It allows identification with the help of the visible test present on the screen with the help of Xpath function text().
Before explaining the importance of XPath let’s just go through the different types of locators available for automation testing.
In this blog, we will learn about the different types of Xpaths and how to implement them so that we can locate our web elements quickly using the selenium web driver. Basically, there are two types of Xpaths
1. Absolute XPath:
In this type, The XPath starts from the beginning or from the root node of the HTML DOM structure. It is a direct way to locate or find the web element but the disadvantage of absolute XPath is that as we are creating it from the start of the HTML DOM structure if there are any changes introduced in the created path of the web element then it gets failed. In this type of locator, we only use tags or nodes. The main advantage of this is that we can select a web element from the root node as it starts with the single forward slash “ / ”.
Example:
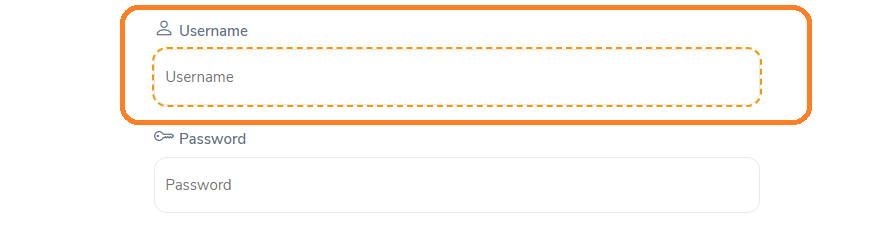
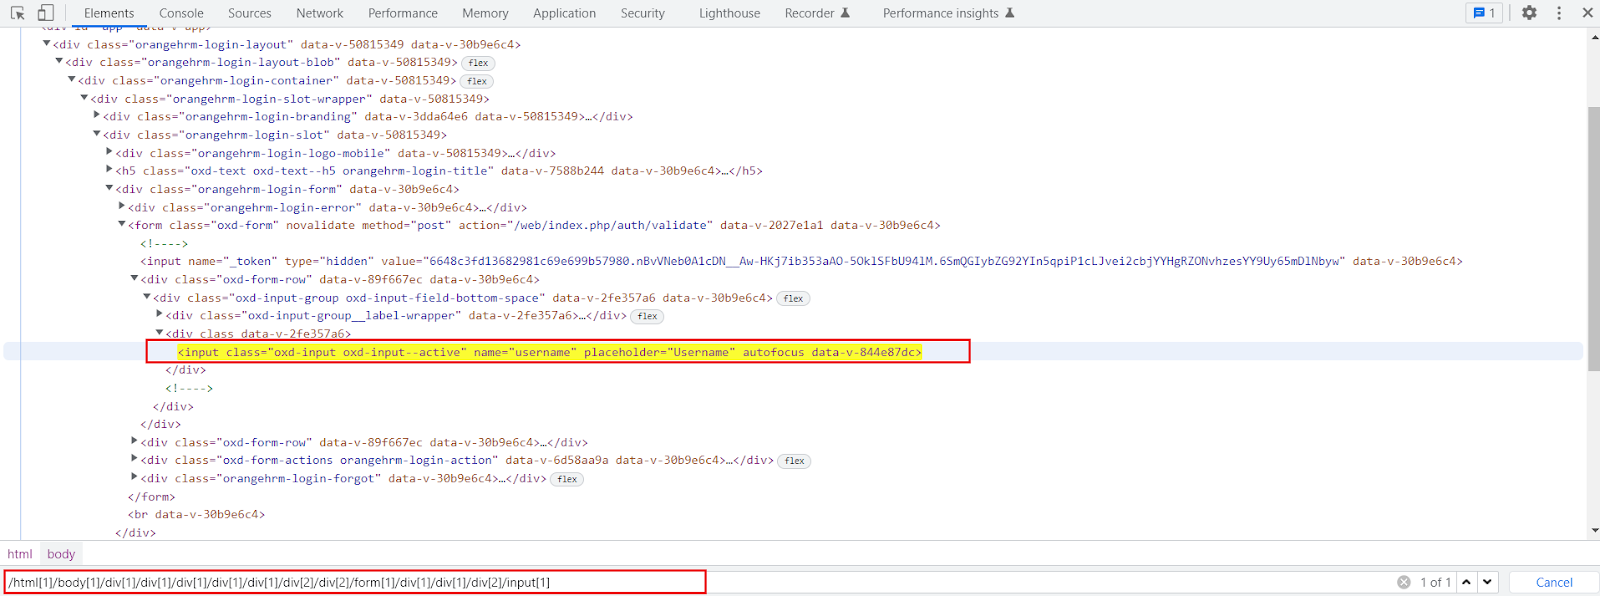
Here is an example of an absolute Xpath for an input field box.
The absolute XPath is: /html[1]/body[1]/div[1]/div[1]/div[1]/div[1]/div[1]/div[2]/div[2]/form[1]/div[1]/div[1]/div[2]/input[1]
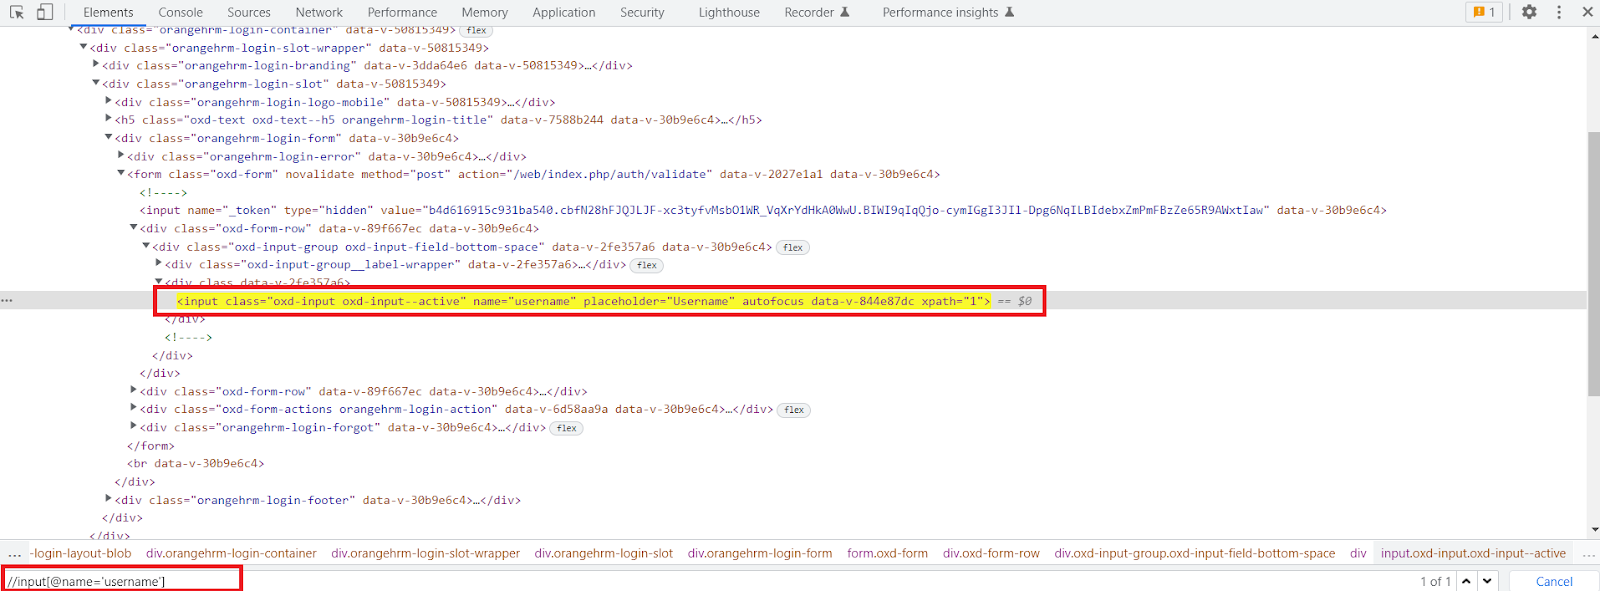
2. Relative Xpath:
Compared to an absolute XPath the relative XPath does not start from the beginning of the HTML DOM structure. It starts from where the element is present e.g. from the middle of the HTML DOM structure if the element is located there. We don’t have to travel from the start of the HTML DOM structure. The relative Xpath starts with a double forward slash “ // “ and it can locate and search the web element anywhere on the webpage. Relative XPath directly jumps to elements on DOM. The other difference between absolute and relative XPath is that in absolute XPath we use tags or nodes but in relative XPath we use attributes.
Example:
We are writing the relative XPath for the same input field for which earlier we created an absolute XPath.
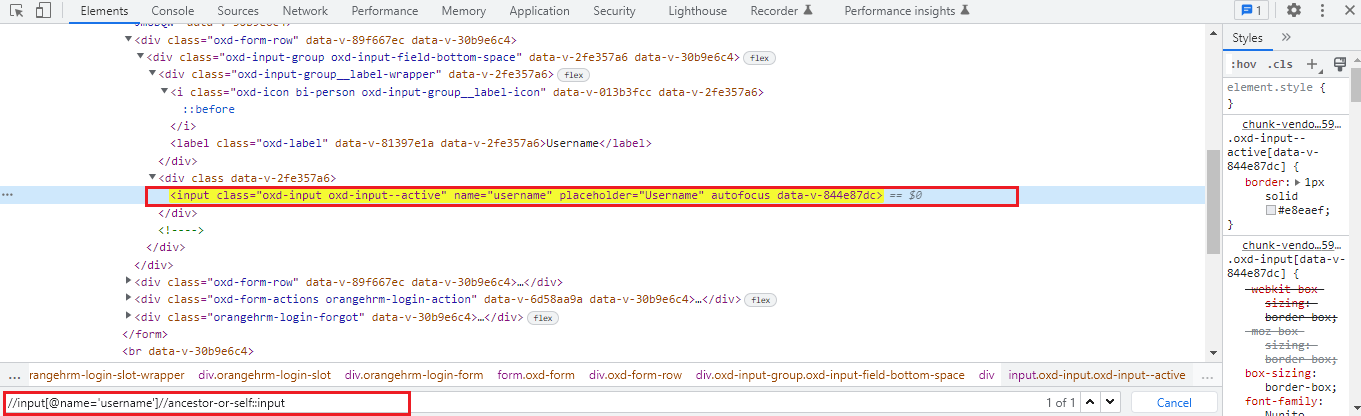
Relative XPath is:
//input[@name=’username’]
XPath Functions:
It is not always possible to locate a web element using relative XPath that is because at some times while locating a particular web element there is the possibility of elements that have similar properties, for example, the same id, name, or same class name. So, here the basic XPath won’t work efficiently for finding that web element. Xpath functions are used to write the efficient XPath by locating a web element with a unique value. Basically, there are three types of XPath functions as follows,
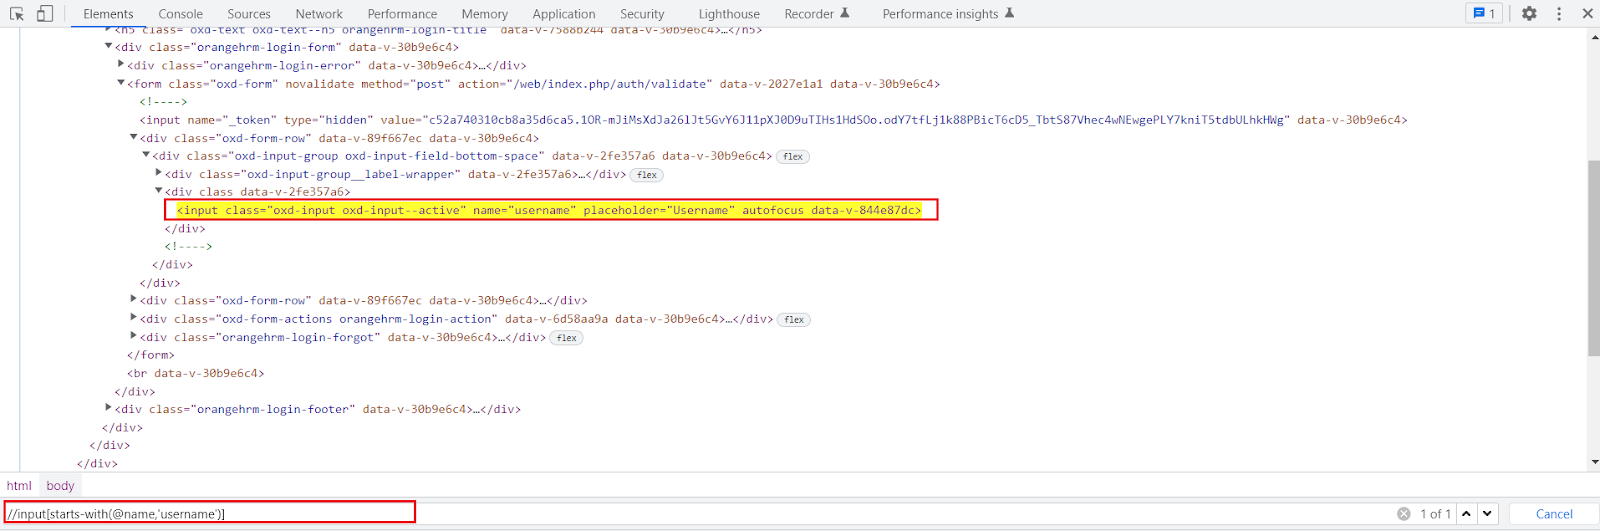
a. starts-with() Function:
starts-with() function is very useful in locating dynamic web elements. It is used to find the element in which the attribute value starts with some particular character or text.
While working on the dynamic web page the starts-with function plays an important role. We can use it to match the starting value of a web element that remains static.
It can also locate the web element whose attribute value is static.
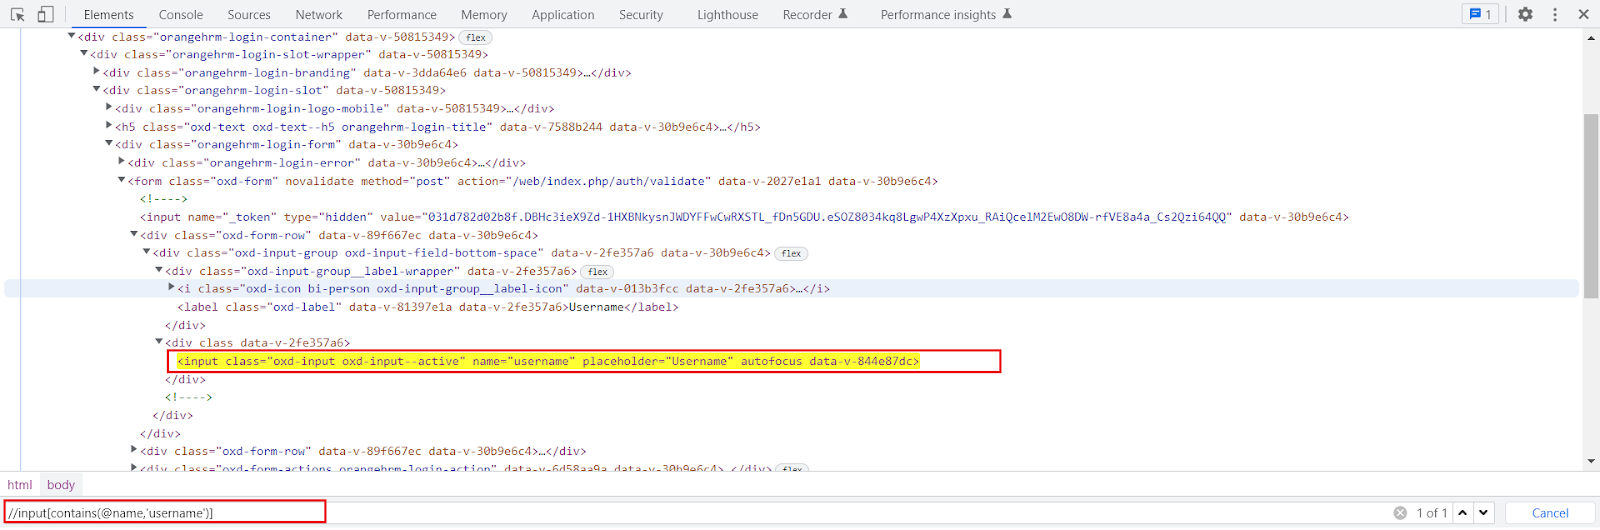
Just like the start-with() function explained above, the contains() function is also used to create a unique expression to locate a web element.
It is used when if a part of the value of an attribute changes dynamically the function can navigate to the web element with the partial text present.
We can provide any partial attribute value to locate the web element.
It accepts two parameters the first one is the attribute of the tag must validate to locate the web element and the second one is the value of an attribute is a partial value that the attribute must contain.
Syntax:
Xpath = //tagname[contains(@attribute,’value’)]
Example:
//input[contains(@name,’username’)]
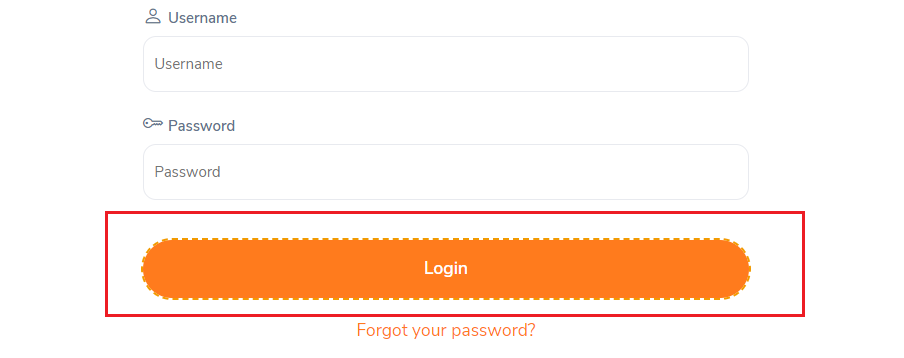
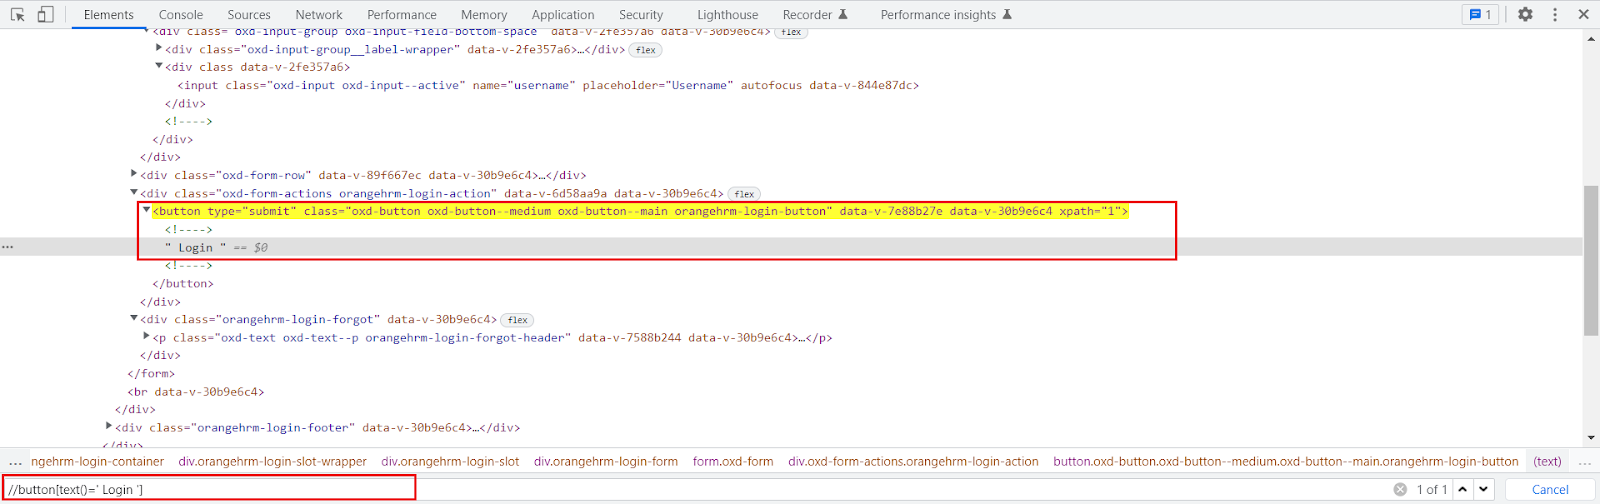
c. text() Function:
text() Function:
The text() function is used to locate web elements with exact text matches.
The function only works if the element contains the text.
This method returns the text of the web element when identified by the tag name and compared it with the value provided on the right side.
Syntax:
Xpath = //tagname[text()=’Actual text present’]
Example:
//button[text()=’ Login ‘]
How to use AND & OR in XPath:
AND & OR expressions can also be used in selenium Xpath expressions. Very useful if you want to use more than two attributes to find elements on a webpage.
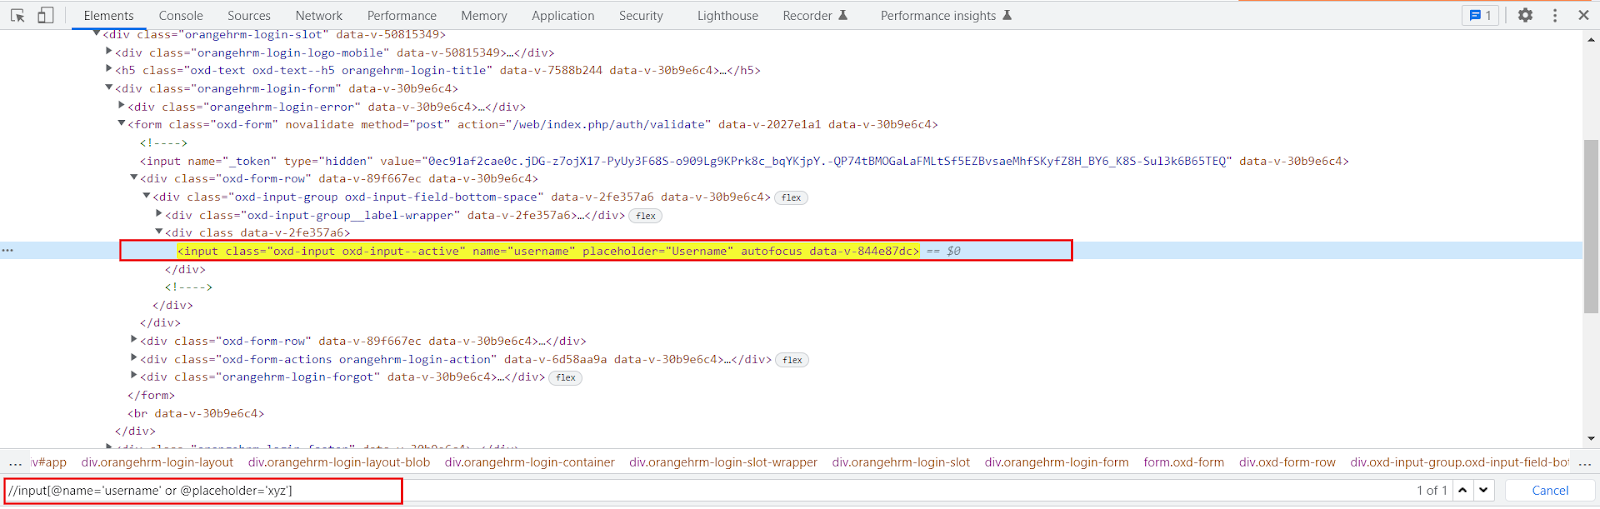
The OR expression requires two conditions and it will check whether the first condition in the statement is true if so then it will locate that web element and if not then it will go for the second condition and if that is true then also it will locate that web element. So, here the point we should remember is that when we are using the OR expression at least either of two of the conditions should be true then, and then only it will find and locate that web element.
Syntax:
Xpath = //tagname[@attribute=’Value’ or @attribute=’Value’]
Example:
//input[@name=’username’ or @placeholder=’xyz’]
Here the first condition is true and the second one is false still the web element got located.
Just like the OR expression the AND expression also requires two conditions but the catch here is that both the provided condition must be true then and then only the web element will get located. If either of the conditions is false then it will not locate that web element.
Syntax:
Xpath = //tagname[@attribute=’Value’ and @attribute=’Value’]
Example:
//input[@name=’username’ and @placeholder=’Username’]
In this case, both the condition provided for an AND expression is true hence the web element got located.
XPath Axis:
It is a method to identify those dynamic elements that are impossible to find by normal XPath methods. All the elements are in a hierarchical structure and can be either located using absolute or relative Xpaths but it provides specific attributes called XPath axis to locate those elements with unique XPath expressions. The axes show a relationship to the current node and help locate the relative nodes concerning the tree’s current node. The dynamic elements are those elements on the webpage whose attributes dynamically change on refresh or any other operations. The HTML DOM structure contains one or more element nodes and they are known as trees of nodes. If an element contains the content, whether it is other elements or text, it must be declared with a start tag and an end tag. The text defined between the start tag and the end tag is the element content.
Types of XPath Axis:
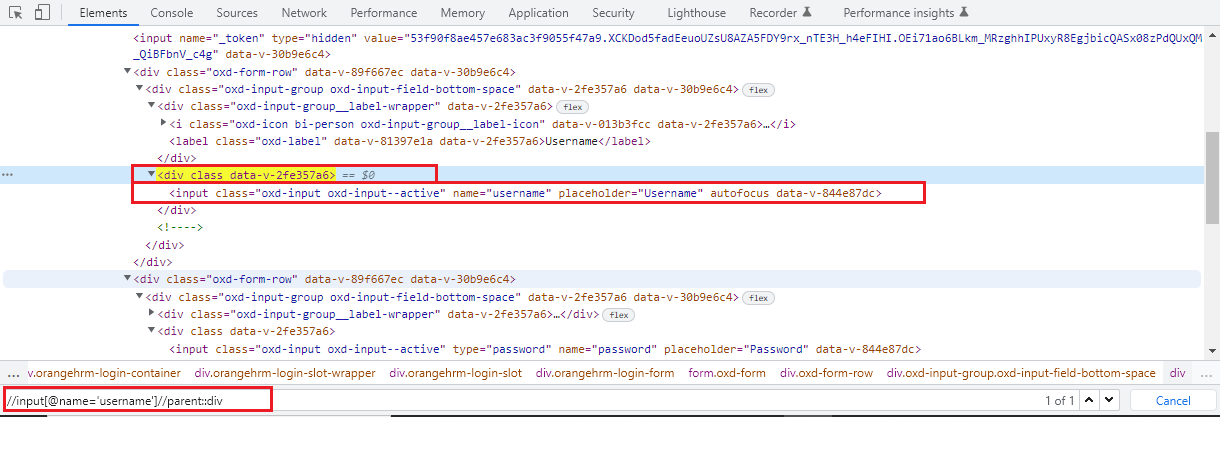
1. Parent Axis XPath:
With the help of the parent axis XPath, we can select the parent of the current node. Here, the parent node can be either a root node or an element node. The point to consider here is that for all the other element nodes the maximum node the parent axis contains is one. Also, the root node of the HTML DOM structure has no parent hence the parent axis is empty when the current node is the root node.
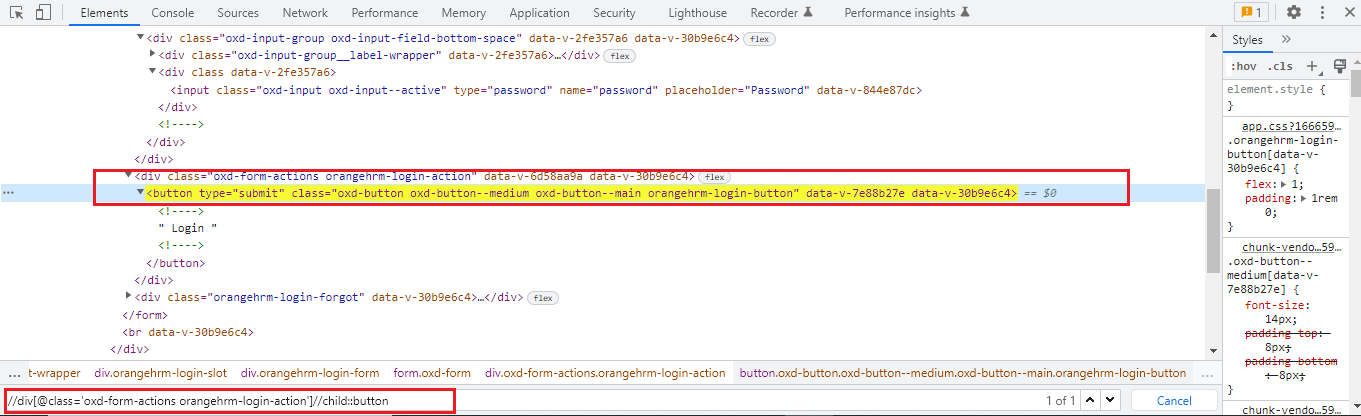
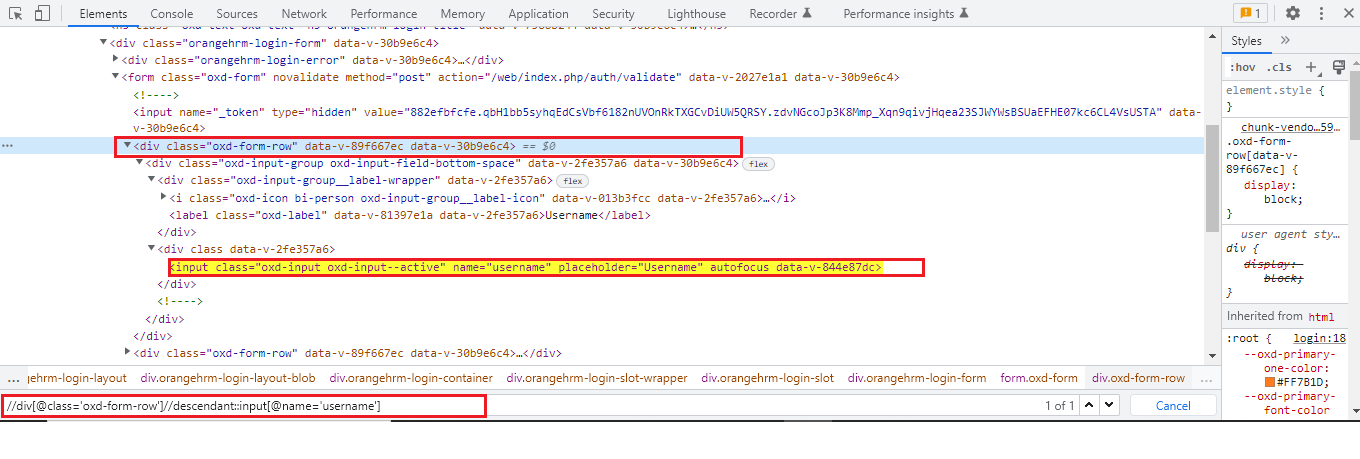
As we have seen using the parent axis XPath actually we are creating an XPath by the following bottom-up approach but here in the child axis case, we are going to follow the top-down approach to create an XPath. The child axis selects all the child elements present under the current node. We can easily locate a web element as a child of the current node.
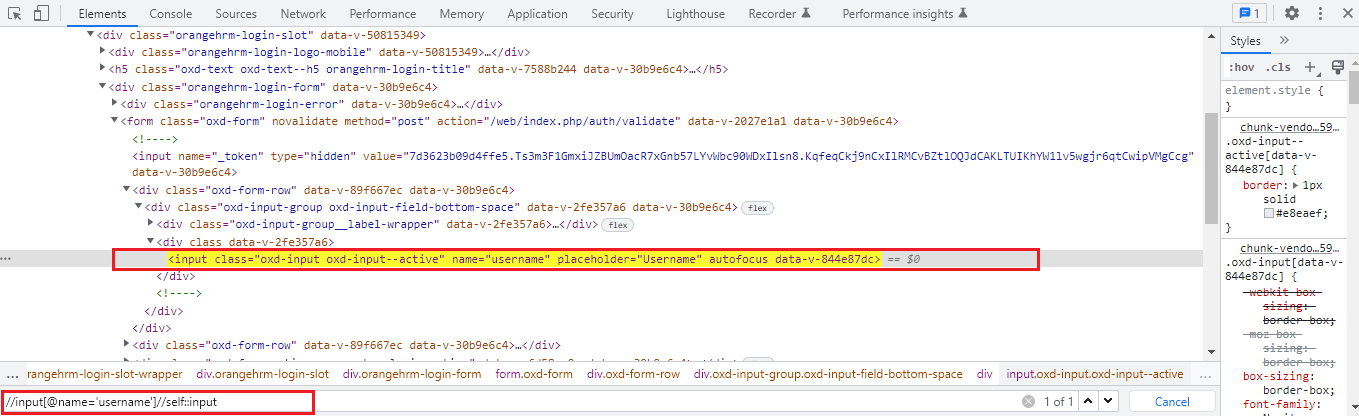
This type of XPath uses its own current node and selects the web element belonging to that current node. You will always observe only one node that represents the self-web element. The tag name we provide at the start and at the end of XPath are the same as they are on the self-axis of the current node. However, this provides the confirmation of the element present when there is more than one element present having the same value and attribute.
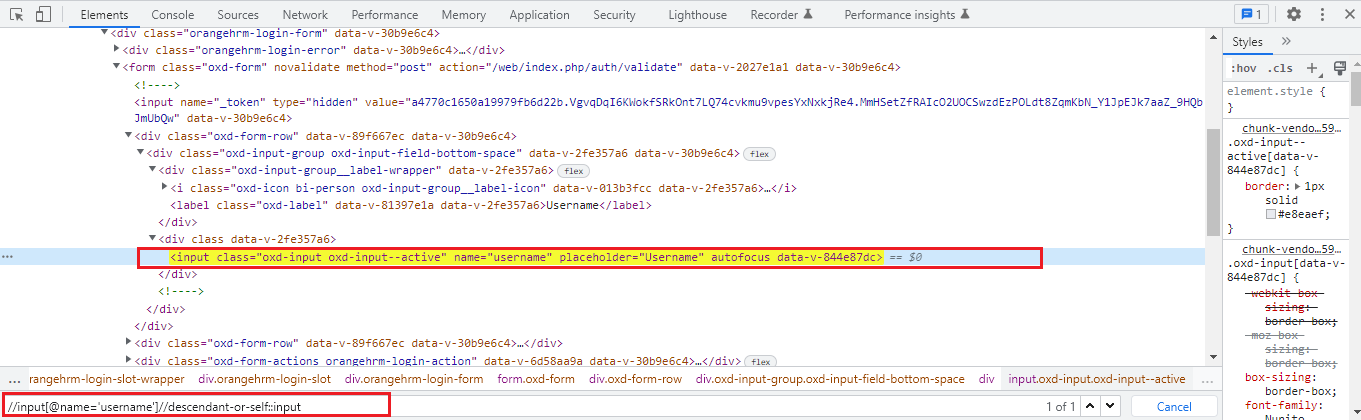
Using this axis we can select the current node and all its descendants i.e. child, grandchild, etc just like a descendant axis. The point to be noticed here is the tag name for descendants and self are the same.
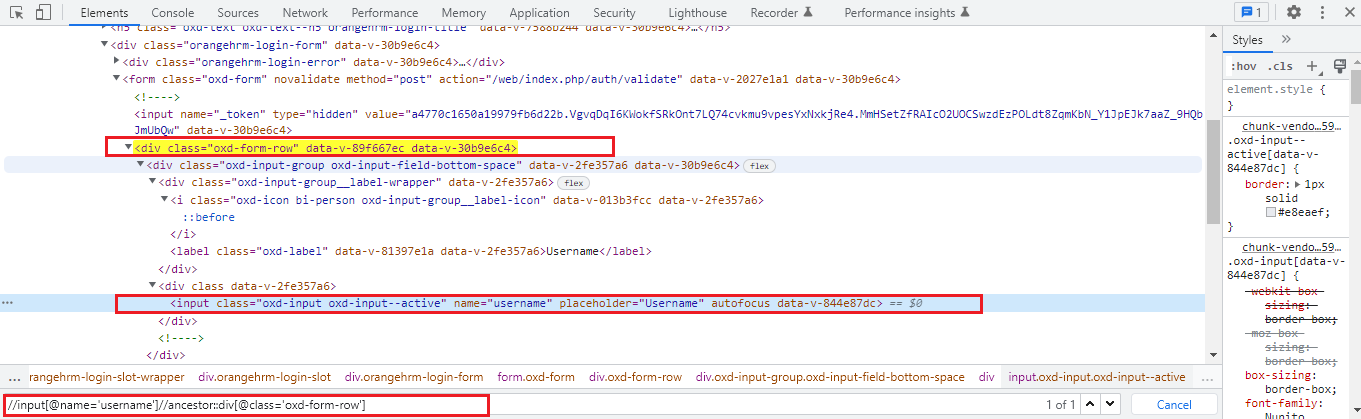
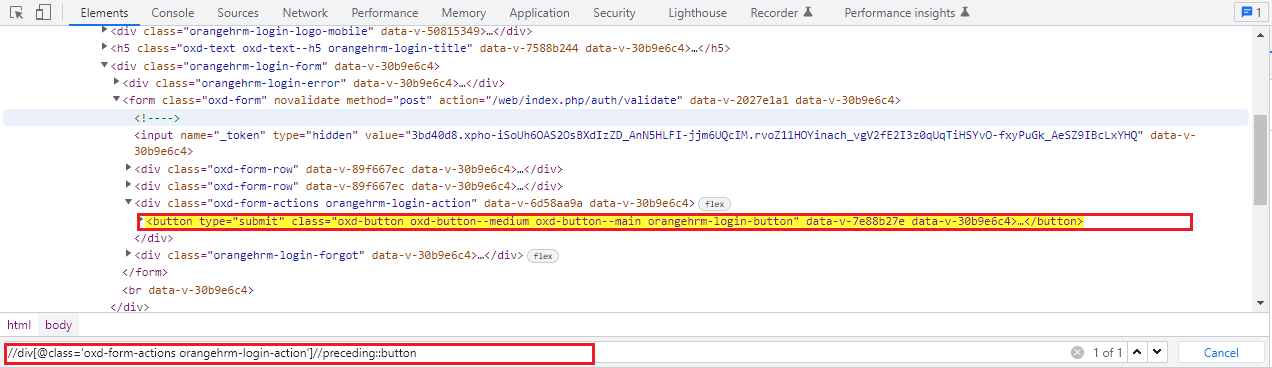
As we understand how the descendant axis works now, the ancestor axis works exactly opposite to that of the descendant axis. It will select or locate all ancestors elements i.e. parent, grandparent, etc of the current node. This axis contains the root node too.
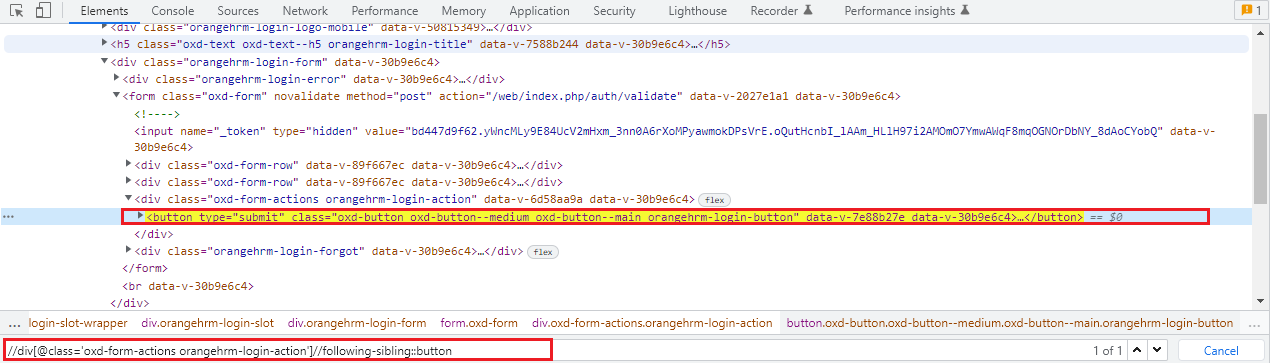
Using the following sibling axis method we can select all the nodes that have the same parent as that of the current node and that appear after the current node.
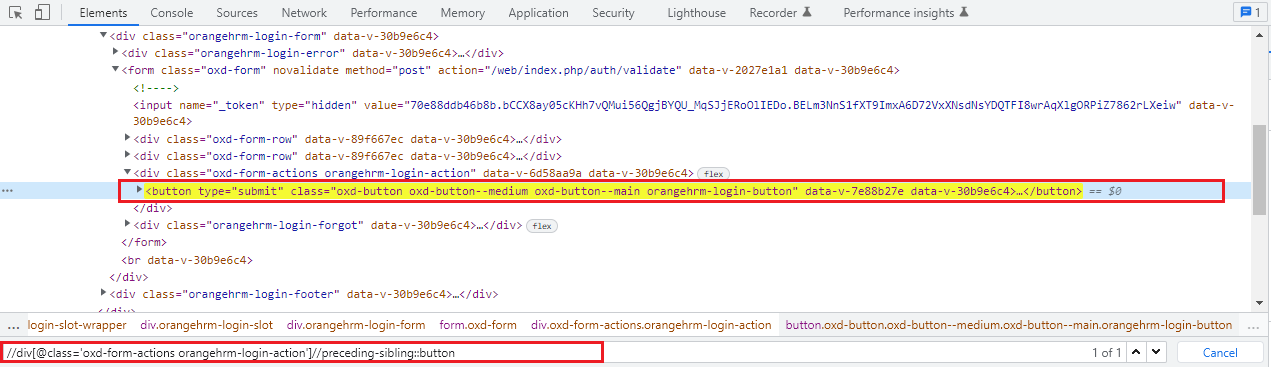
Using the following sibling axis method we can select all the nodes that have the same parent as that of the current node and that appear before the current node. It works opposite to that of the following sibling axis XPath.
You can try all of these examples mentioned above with the Orange HRM Demo website here.
Conclusion:
In conclusion, XPath is an essential tool for web automation testing when using Selenium, Playwright, and Cypress. It allows for more flexibility and specificity in locating elements on a web page. Understanding the different types of XPath expressions and how to use them can greatly improve the efficiency and effectiveness of the automation testing process. It can be particularly useful in situations where elements do not have unique CSS selectors, or when the structure of the HTML changes frequently. With the knowledge of XPath, you can write more robust and stable automation tests.